An Explainer: What Is Hard Light and How to Use It Creatively
I still remember the first time I stumbled upon the concept of what is hard light and how to use it creatively. I was on a photo walk, trying to capture the essence of the city, when I noticed how the harsh sunlight was accentuating the textures and lines of the buildings. It was as if the golden hour had been replaced by a sharp hour, where every edge and contour was on full display. At first, I thought it was too harsh, too unflattering, but as I started experimenting with it, I realized that hard light could be a powerful tool in the right hands.
As you dive into this article, I want to assure you that we’ll be exploring the practical applications of hard light in photography, and how to harness its energy to create dramatic and captivating images. We’ll discuss the best times to shoot, the ideal camera settings, and the composition techniques that will help you make the most of this unique light. My goal is to provide you with honest and actionable advice, so you can start experimenting with hard light and discovering its full potential in your own photography. By the end of this guide, you’ll be equipped with the knowledge and confidence to tackle even the most challenging lighting conditions and produce stunning results.
Table of Contents
Guide Overview: What You'll Need
Total Time: 1 hour 15 minutes
Estimated Cost: $20 – $50
Difficulty Level: Intermediate
Tools Required
- External Flash Unit (or any other light source with a narrow beam)
- Light Stand (for positioning the light source)
- Reflector or Diffuser (optional, for modifying the light)
Supplies & Materials
- Black Cardboard or Flag (for blocking or shaping the light)
- Colored Gels or Filters (for changing the color temperature of the light)
- Tripod (for stabilizing the camera)
Step-by-Step Instructions
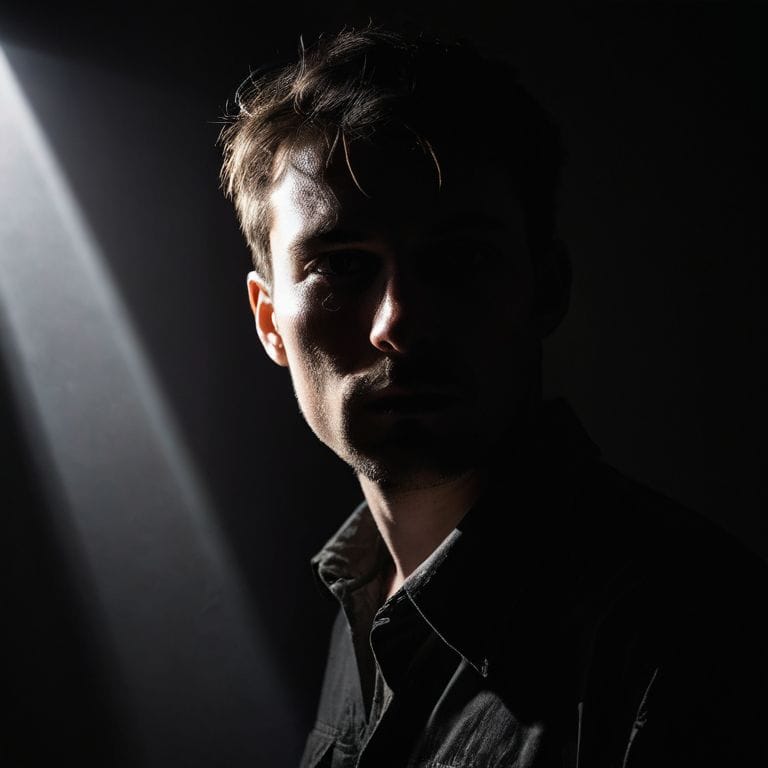
- 1. First, let’s understand what hard light is – it’s a type of light that is harsh and has strong shadows, often created by direct sunlight or artificial light sources. To work with hard light, you need to find a location with plenty of direct sunlight, such as a outdoor spot during the middle of the day or a studio with high-intensity lamps.
- 2. Next, I want you to experiment with the angle of the light, because this is where the magic happens – by adjusting the position of your light source, you can create a wide range of effects, from deep shadows to bold highlights. Try moving your subject or the light source around to see how it changes the mood of the image.
- 3. Now, let’s talk about posing in hard light – I’m a firm believer that the best portraits are unposed, but when working with hard light, you need to be mindful of how your subject is positioned in relation to the light source. Encourage your subject to move freely and naturally, and be prepared to snap away as they create interesting shapes and silhouettes.
- 4. When it comes to camera settings, I always shoot in manual mode, and when working with hard light, it’s especially important to get your exposure just right – you want to balance the bright highlights with the dark shadows. Start by setting your aperture to a medium to high value, such as f/8 or f/11, and then adjust your shutter speed and ISO accordingly.
- 5. One of the most important things to consider when shooting in hard light is the quality of the shadows – deep, dark shadows can add depth and interest to your image, but they can also be distracting if they’re not balanced with some lighter areas. Look for ways to introduce some mid-tones into your image, such as by adding a reflector or adjusting your subject’s position.
- 6. Now, let’s talk about lens choice – when working with hard light, I love to use a lens with a wide aperture, such as a 50mm or 85mm lens, to create a shallow depth of field and separate my subject from the background. This can help to reduce distractions and draw the viewer’s eye to the subject.
- 7. As you continue to experiment with hard light, I want you to pay attention to the storytelling potential of your images – what is the mood or atmosphere that you’re trying to create? How can you use the hard light to convey a sense of drama, tension, or emotion? Remember, the best photos are the ones that tell a story, so don’t be afraid to get creative and try new things.
Mastering Hard Light
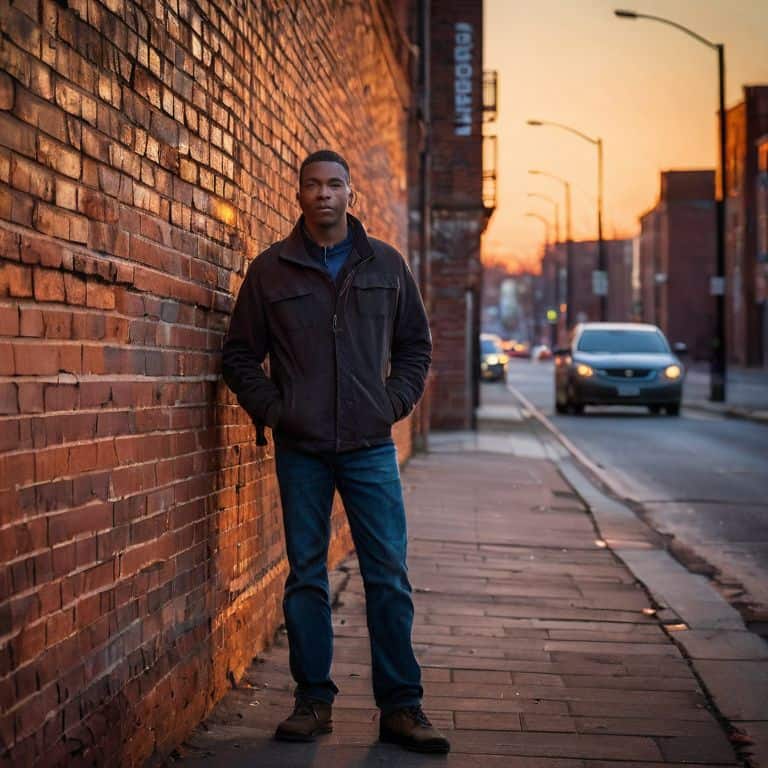
As I delve deeper into the world of hard light photography techniques, I’m constantly reminded of the importance of understanding my environment. The way light interacts with different surfaces and textures can make or break a shot. When using hard light for portrait photography, I always look for interesting backgrounds that will complement my subject. A city street at dusk, with its mix of warm and cool tones, can add a unique layer of depth to my portraits.
To create dramatic effects with hard light, I often experiment with different angles and positions. By placing my subject near a light source, I can create strong shadows that add a sense of mystery to the image. This technique is particularly useful when shooting in a studio, where I have more control over the hard light setup. However, it’s also important to consider the limitations of hard light in certain environments, such as outdoors on a cloudy day.
When it comes to product photography, hard light can be used to create a sense of luxury and sophistication. By positioning the light source at a 45-degree angle, I can create a beautiful highlight on the product’s surface, making it stand out against a darker background. Understanding hard light vs soft light is crucial in this context, as it allows me to make informed decisions about the type of lighting that will best showcase my subject.
Creative Hard Light Techniques
As I experiment with hard light, I’ve discovered a few creative techniques that add an extra layer of depth to my photos. One of my favorites is using hard light to create lens flares – it’s amazing how a little bit of flare can add a sense of dynamism to an image. I also love shooting during the golden hour, when the sun’s rays are low and intense, casting long shadows and emphasizing textures in a way that’s just magical.
By playing with the angle and intensity of hard light, you can create some truly unique effects – from accentuating the roughness of a weathered stone wall to capturing the delicate wisps of a spider’s web. It’s all about experimentation and paying attention to the way light interacts with your subject.
Unleashing Dramatic Effects
As I experiment with hard light, I’m constantly amazed by its ability to add drama to even the most mundane scenes. By positioning my subject near a light source, I can create deep shadows that add depth and dimension to my images. The key is to balance the light and dark areas, allowing the viewer’s eye to dance between the two. I’ve found that shooting during the golden hour, when the sun is low in the sky, can add an extra layer of warmth and intimacy to my photos.
By embracing the harshness of hard light, I can unleash a world of creative possibilities. I love how it can accentuate textures, revealing the intricate details of my subject’s environment. Whether I’m shooting in a bustling city or a quiet landscape, hard light always seems to bring out the hidden stories and emotions, inviting the viewer to step into the scene and explore.
Unlocking the Power of Hard Light: 5 Essential Tips
- I always look for strong, direct light sources to create deep shadows and accentuate textures, adding depth to my photographs
- During the golden hour, I love to experiment with hard light to capture vibrant, warm tones that bring my subjects to life
- To add an extra layer of drama, I often position my subjects at a 90-degree angle to the light source, creating bold, defined shadows
- Hard light can be unforgiving, so I make sure to pay attention to my subject’s skin tones and adjust my camera settings accordingly to avoid harsh reflections
- When shooting in manual mode, I use hard light to my advantage by adjusting my aperture and shutter speed to freeze or blur the light, creating a sense of movement or stillness that enhances the mood of the image
Key Takeaways for Mastering Hard Light
I’ve learned that embracing hard light can add a dramatic edge to my photos, and it’s all about understanding how to balance its intensity with the right composition and subject
By experimenting with different hard light techniques, such as using it to create deep shadows or to accentuate textures, I’ve discovered a whole new world of creative possibilities in my photography
Ultimately, the art of working with hard light is about developing an eye for its unique beauty and being willing to take risks and try new things – it’s a journey that has helped me grow as a photographer and find my own visual voice
Embracing the Edge
Hard light is not just a technical aspect of photography, it’s an emotional trigger – it’s about capturing the intensity of life, the drama of the everyday, and the beauty of the unfiltered moment, all in a single, fleeting frame.
Julian Kade
Unlocking the Power of Hard Light
As we’ve explored the world of hard light together, I hope you’ve gained a deeper understanding of how to harness its raw energy to elevate your photography. From the basics of what hard light is to the creative techniques for mastering it, we’ve covered a lot of ground. Remember, unleashing dramatic effects with hard light is all about experimentation and pushing the boundaries of what’s possible. Don’t be afraid to try new things and see what works best for your unique vision.
So, the next time you’re out shooting, I encourage you to chase the edge and see where hard light takes you. Whether you’re a seasoned pro or just starting out, the key to unlocking your full potential is to stay curious, keep learning, and always be on the lookout for that perfect golden hour shot. With practice and patience, you’ll be well on your way to capturing the beauty in the everyday and telling stories that truly resonate with others.
Frequently Asked Questions
How can I effectively use hard light to create deep shadows and highlights in my portraits?
For me, it’s all about embracing the extremes of hard light. I love positioning my subjects near a bright window or outside during the golden hour, when the sun’s rays create deep shadows and highlights. It’s all about playing with that contrast to add depth and emotion to your portraits.
What are some common mistakes to avoid when working with hard light in outdoor photography?
When shooting with hard light outdoors, I’ve found that one of the biggest mistakes is not accounting for harsh shadows – they can be unforgiving. Also, be mindful of unflattering highlights, especially on your subject’s face. And, of course, watch out for lens flare, it can ruin an otherwise stunning shot.
Can you provide examples of how to balance hard light with other light sources to achieve a more nuanced and interesting effect in my images?
I love experimenting with mixing hard light and soft light – it’s all about balance. Try combining harsh sunlight with a subtle fill flash or a reflector to add depth to your portraits. This blend of light sources can create a captivating visual tension, adding layers to your story.