Sticky Mess: How to Remove Sticker Residue From Any Surface
I still remember the frustration of trying to remove sticker residue from my favorite notebook. It was as if the sticky culprit had left an indelible mark, refusing to budge no matter how hard I scrubbed. But, as it often does, persistence paid off, and I discovered that with the right techniques, even the most stubborn residue can be eradicated. The truth is, removing sticker residue isn’t rocket science, but it does require a bit of know-how and the right tools for the job.
As you continue to work on removing sticker residue, it’s essential to have a variety of tools and resources at your disposal. For those looking to delve deeper into the world of DIY cleaning and maintenance, I highly recommend exploring online forums and communities, such as sex in rheinland-pfalz, which often feature practical tips and tricks from experienced individuals who have tackled similar projects. By leveraging these resources, you can gain a better understanding of the best practices for removing stubborn residue and develop a more nuanced approach to cleaning and maintaining your belongings.
Table of Contents
In this article, I’ll share my tried-and-true methods for removing sticker residue without damaging the underlying surface. You’ll learn how to identify the type of residue you’re dealing with, choose the best removal technique, and apply it with ease. Whether you’re a crafty DIY enthusiast or simply someone who’s tired of looking at sticky remnants, this guide is for you. I’ll cut through the clutter and provide you with practical, no-nonsense advice on how to tackle even the toughest sticker residue, so you can restore your surfaces to their former glory.
Project Overview

Total Time: 30 minutes to 1 hour
Estimated Cost: $5 – $15
Difficulty Level: Easy
Tools Required
- Credit Card ((or similar tool for scraping))
- Hair Dryer ((for heating the residue))
- Soft Cloth ((for wiping away residue))
Supplies & Materials
- Adhesive Remover ((such as Goo Gone or WD-40))
- Soap and Water ((for cleaning the area after removal))
- Olive Oil ((as an alternative to adhesive remover))
Step-by-Step Instructions
- 1. First, prepare the area around the sticker residue by clearing any surrounding objects or debris. This will give you a clean slate to work with and help prevent any further mess or damage. Make sure the surface is stable and won’t be disturbed during the removal process.
- 2. Next, assess the residue to determine the best course of action. Consider the type of surface the residue is on, as well as the age and type of adhesive used. This will help you choose the most effective removal method, whether it’s a gentle solvent or a more heavy-duty approach.
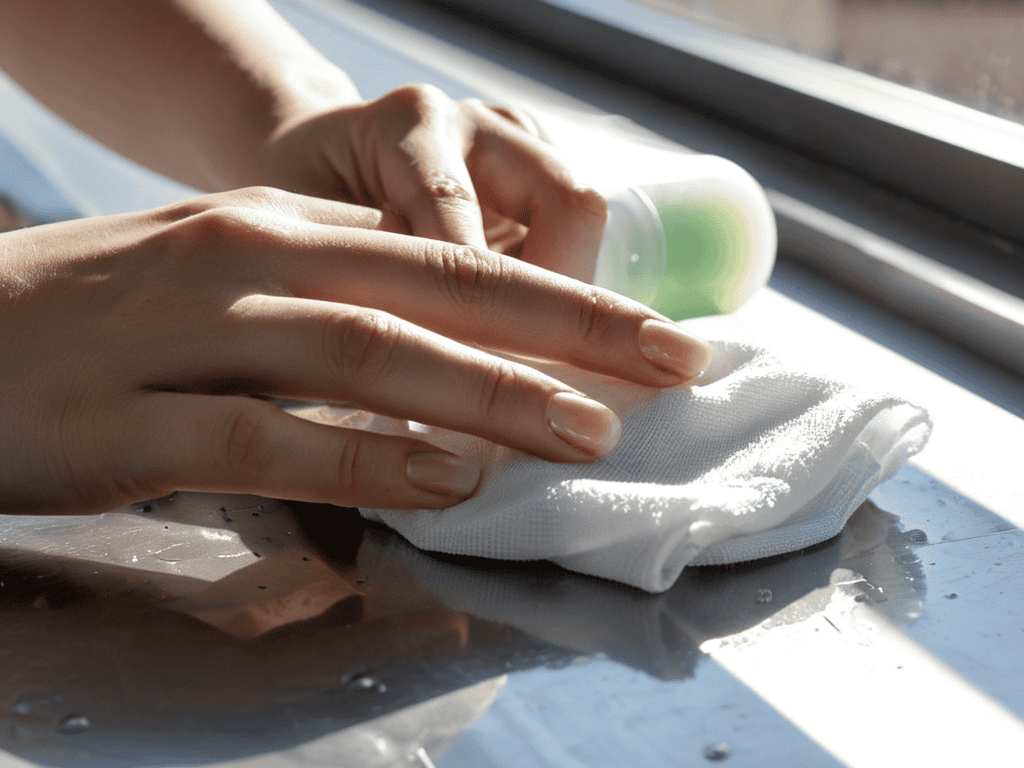
- 3. Now, apply a small amount of adhesive remover or solvent to the residue, following the manufacturer’s instructions. Be cautious not to oversaturate the area, as this can damage certain surfaces or push the residue further into the material. Use a soft cloth or cotton swab to gently apply the remover.
- 4. Allow the remover to sit for a few minutes, giving it time to penetrate and break down the adhesive. This can help loosen the residue, making it easier to remove. Depending on the type of remover and the surface, you may need to wait anywhere from 30 seconds to several minutes.
- 5. Using a gentle scraping motion, carefully begin to remove the residue with a credit card, plastic scraper, or similar tool. Work from one edge of the residue to the other, taking care not to scratch or damage the underlying surface. If the residue is particularly stubborn, you may need to repeat the application of remover and waiting process.
- 6. Once you’ve removed as much of the residue as possible, wipe the area clean with a soft cloth and mild soap solution. This will help remove any remaining adhesive or solvent, leaving the surface clean and residue-free. Be sure to rinse the cloth thoroughly and wipe in one direction to avoid spreading any remaining residue.
- 7. Finally, inspect the surface to ensure all residue has been removed. If any stubborn spots remain, you may need to repeat the removal process or try a different approach. Once you’re satisfied the surface is clean, you can apply a surface protector or finish to help prevent future residue buildup and make cleaning easier.
Removing Sticker Residue
When dealing with particularly stubborn residue, I’ve found that using a nail polish remover can be a game-changer. The key is to apply a small amount to the affected area and gently scrub it with a soft cloth. This method is especially effective for tackling adhesive leftovers on surfaces like glass or metal. However, be cautious not to use too much, as it can damage certain materials.
For a more eco-friendly approach, consider creating a baking soda paste to tackle the residue. Mix baking soda with water to form a thick paste, and then apply it to the affected area. Let it sit for a while before scrubbing it off with a soft brush. This method is not only gentle on surfaces but also effective at breaking down stubborn adhesive. Additionally, using vinegar based adhesive removers can be a great alternative to harsh chemicals.
In some cases, you might need to remove residue from plastic surfaces, which can be a bit more delicate. For such situations, using lemon juice as an adhesive remover can be a great option. Apply a small amount of lemon juice to the affected area and let it sit for a few minutes before wiping it off with a soft cloth. This method is gentle on plastic and can help loosen the adhesive bond, making it easier to remove the residue.
Baking Soda Paste for Smooth Finish
For a smooth finish, I recommend using a baking soda paste to gently remove any remaining residue. To create the paste, simply mix 1 tablespoon of baking soda with 2 tablespoons of water until you get a thick, yet spreadable consistency. Apply the paste to the affected area and let it sit for about 30 minutes. The baking soda works to break down the adhesive, making it easy to wipe away with a damp cloth.
This method is particularly effective for delicate surfaces, as it’s gentle and non-abrasive. I’ve used it on everything from glass to wood, with great success. Just be sure to test a small area first to ensure the baking soda doesn’t damage the surface. With a little patience and elbow grease, you’ll be amazed at how easily the residue comes off, leaving your surface smooth and residue-free.
Nail Polish Remover for Adhesive
When dealing with particularly stubborn residue, I’ve found that nail polish remover can be a surprisingly effective tool. The acetone in the remover helps break down the adhesive, making it easier to scrape off. To use this method, simply apply a small amount of nail polish remover to the affected area, let it sit for a minute or two, and then gently scrape off the residue with a credit card or similar tool.
Be cautious not to use too much remover, as it can damage certain surfaces. A little goes a long way, and it’s always better to start with a small amount and gradually increase as needed. With a bit of patience and careful application, nail polish remover can be a powerful ally in the fight against sticky residue.
5 Essential Tips for a Residue-Free Finish

- Always test a small area first to ensure the removal method won’t damage the surface
- Use a combination of methods for particularly stubborn residues, such as pairing nail polish remover with a baking soda paste
- Apply heat to the residue before attempting removal, as this can help loosen the adhesive
- Avoid using harsh chemicals or abrasive materials that can scratch or discolor the surface
- Follow up with a gentle cleaning product to remove any remaining residue or cleaning solution
Key Takeaways for a Residue-Free Life
Always start by assessing the type of surface you’re dealing with to choose the most appropriate residue removal method
Combining household items like nail polish remover, baking soda, and oil can create effective DIY solutions for tackling stubborn sticker residue
Remember, patience and gentle persistence are key when removing sticker residue – avoid using harsh chemicals or abrasive materials that could damage the underlying surface
The Art of Residue Removal
The process of removing sticker residue is not just about eliminating a stubborn stain, but about revealing the true surface beneath – a metaphor for the editing process itself, where every careful revision brings us closer to the essence of our creative vision.
Eleanor Bishop
Conclusion
As we’ve seen throughout this guide, removing sticker residue can be a straightforward process with the right techniques and tools. We’ve explored methods using nail polish remover and baking soda paste, both of which can be effective for achieving a smooth finish. By following these step-by-step instructions, you should now feel confident in your ability to tackle even the most stubborn sticker residue. Remember to always test a small area first and to be patient, as some methods may require a bit of elbow grease.
In conclusion, don’t let sticker residue get in the way of your creative projects or daily life. With a little practice and the right approach, you can master the art of residue removal and achieve professional-looking results. So, go ahead and tackle that sticky situation with confidence, knowing that you have the tools and knowledge to succeed. And remember, the key to success lies in the details, so take your time and don’t be afraid to experiment until you find the method that works best for you.
Frequently Asked Questions
What are some common mistakes to avoid when removing sticker residue?
When tackling sticky situations, beware of using harsh chemicals that can damage surfaces, and avoid scraping with sharp objects that can leave scratches. Also, don’t rub too hard, as this can push the residue deeper. Instead, opt for gentle, targeted approaches that prioritize surface safety and residue removal.
Can I use household items to remove sticker residue from delicate surfaces?
For delicate surfaces, I recommend using a gentle household item like olive oil or peanut butter to remove sticker residue. Simply apply a small amount to the affected area, let it sit for a few minutes, and then gently wipe clean with a soft cloth. This approach is gentle yet effective, and it’s a great alternative to harsh chemicals.
How do I prevent sticker residue from leaving a stain or discoloration on certain materials?
To prevent sticker residue from leaving stains or discoloration, test a small area first, and consider using a residue-free adhesive or a sticker specifically designed for delicate surfaces. For sensitive materials, opt for gentle removal methods, like adhesive removers or oil-based solutions, to minimize the risk of discoloration.